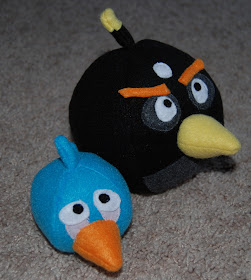
Obsessively Stitching posted the tutorial and patterns for the green pig and the blue bird. Here's my blue bird. . .
I didn't have any green fleece, so I opted to make my own pattern/design for the black bomb bird. I think he turned out good. Though I may end up moving the black dot in the middle of his eyes, he looks more surprised than angry. The black bird is bigger than the red one in the game, so hopefully I made him bigger. (The red one is wrapped up for Christmas already so I can't compare it.)
Here's the red one I made a while back.
Friday, December 17, 2010
2x4 Snowman
My new favorite blog is Under My Umbrella. My "to-do" craft list pretty much doubled. :)
Once I saw this 2x4 snowman, I knew it was destined to make it to the top of my list. I don't have MDF for the hats like she used in the tutorial, but I have an awesome friend from church who gave me their leftover scrap wood. So I was able to make the hats out of 2x2's and other scrap pieces. I had the same polka dot paper she used for the hat, so that was cool.
I had enough 2x4's to make 2 of them, but then I realized I could cut them in half (so they weren't as deep) and end up with 4. Now the tough part is deciding which one I want to keep and who to give the other 3 to.
But 4 sets of snowmen means lots of blocks to sand and paint. And when you have a 2 year-old, they aren't snowmen . . . they're blocks for a wall or tower to build and destroy.
Once I saw this 2x4 snowman, I knew it was destined to make it to the top of my list. I don't have MDF for the hats like she used in the tutorial, but I have an awesome friend from church who gave me their leftover scrap wood. So I was able to make the hats out of 2x2's and other scrap pieces. I had the same polka dot paper she used for the hat, so that was cool.
I had enough 2x4's to make 2 of them, but then I realized I could cut them in half (so they weren't as deep) and end up with 4. Now the tough part is deciding which one I want to keep and who to give the other 3 to.
Monday, December 13, 2010
Knee High Socks turned Arm Warmers
My hands are always cold, and these have been great while driving or just wearing around the house. I've seen this idea floating around for the last couple years, but I did it a little different than I've seen them so far. It's hard to take a picture of your own arm :)
I took an old pair of knee high socks that I've had for about 12-13 years - they got too tight after highschool/college but I couldn't part with them. And I made this pair right before Halloween, so the colors went great for my wardrobe choice. I cut off the foot part like so . . .
Most examples I've seen have the finished stretchy top of the sock as the part by your elbow, but I made that the part on my hand and used the unfinished edge as the upper arm side - much more forgiving of non-skinny arms :)
I also made a "button hole" of sorts as the thumb hole - this was tricky, and I swore I'd never do it again, but I just made 3 more sets today :). I did two lines of tight zigzag stitches where I wanted the thumb and then a wider stitch to keep the ends together. It's tricky sewing in a small sock opening. (you could try an actual button hole on a scrap, but my machine wouldn't make it big enough and the sock kept stretching and it didn't work that way for me.
The ones I made today had a little something extra on them. I had plain knee high socks and felt they needed a bit more to them, so I cut up the foot part (cut off the heel and the toe pieces) and sewed them to the alternating sock (grey went to black and black went to grey) as a cuff. Here is a picture of how I cut them.
To get the rolled edge look, stretch the edge of the sock like my little helper is and then roll it down a little.
Here they are with the new cuff (that went by the elbow.)
Friday, December 10, 2010
Different way to display the Seasonal Blocks
Back in September, I made a set of the Seasonal Word Blocks. There are 16 different words to spell with the 7 block set, and the Christmas ones are "snow" or "winter." But I went to someone's house who had them stacked vertically to spell "snow," and it looked adorable.
But her's were different colors of letters and paint, and mine didn't look so festive like her's did. So I added ribbon (which also helped cover up the side letters). I think mine would look more Christmas-y if the letters where white, oh well.
Turning ONE (with cupcake template download)
My daughter turned ONE last week. And on the day of her party, I woke up at 3:30 in the morning with the realization that I hadn't made her a special birthday shirt to wear at her party!!!!! Any prepared crafty momma would have already done this - but I guess I like to wait till the last minute. So here's what I came up with in the wee hours of the morning.
I used wonder under to adhere the appliques to the shirt and added a pink button as the "cherry" on the cupcake. Doesn't she look adorable? I also had previously made the korker bow and headband - which matched perfectly!
My birthday wish for her was some hair - I wonder what she wished for?
I drew the cupcake myself, so if anyone wants the template, download it here! I used the same template as I did for her denim picture book . . .
Thursday, December 9, 2010
Angry Birds Plush
My husband LOVES Angry Birds (played on his phone)...and to be honest, I love it too. I'm almost as far as him in the levels. And this game is one of my 2 year old's favorite ones to play when I need to keep him quiet - like in the doctor office yesterday. Basically, you slingshot the birds to destroy structures and the pigs (who stole the bird's eggs - that's why they're angry).
After seeing this idea on Obsessively Stitching a few days ago, I knew I needed to make one for my husband for Christmas. She's working on patterns for the other variations of birds and pigs as well, so I'm looking forward to those!
It was really easy to make. My only struggle was sewing on the beak - I had a hard time getting the needle in and out. If I make more, I might try sewing on the beak before stuffing the ball part - but then it might get distorted if I do it that way, but it's worth a try since I just couldn't get it to work good. I love how it turned out though.
Wednesday, December 8, 2010
Super Hero Cape
My son doesn't check my blog - so it's safe to post his Christmas presents on here. But I'm getting antsy for Christmas to be over so that I can show you all what I've been making. Everyone else checks my blog, so it's not safe till Christmas is over.
I started this cape about 9-10 months ago (made the pattern and cut out the fabric). And then I finally got around to sewing it in the last month or so. I just wasn't excited to sew on the plasticy pleather fabric. I tinkered with different designs - starting out with a bunch of papers taped together to get the length and width and then made about a dozen different designs for the neck/closure section before I got something I liked and that fit him good. It has a velcro closure at the neck and the length just brushes the ground - I figured it was a good length to start with so that it would grow with him and last longer.
Then I found a mask template online- and knew that needed to be an addition to the outfit. I can't remember where I found the template, but I just google'd "superhero mask pattern" and looked through the options till I found one I liked. This was my second attempt. The first one was a horrible mess - I don't have a teflon foot for my machine and the stitching was horrible and the fabric stuck to the foot and wouldn't move. Then I remembered reading a blog that suggested using baby powder on vinyl to help the sewing process. I figured if it works on vinyl, it should work on this. And it DID! It's just really messy and I had to wait till the kiddos were asleep to do this.
I backed the mask in black felt since that gave it more stability - but after my first horrible mask, I realized it was better not to cut out the black felt in the mask shape before sewing it. The red pleather stretched and it was better to cut after it was top stitched.
I started this cape about 9-10 months ago (made the pattern and cut out the fabric). And then I finally got around to sewing it in the last month or so. I just wasn't excited to sew on the plasticy pleather fabric. I tinkered with different designs - starting out with a bunch of papers taped together to get the length and width and then made about a dozen different designs for the neck/closure section before I got something I liked and that fit him good. It has a velcro closure at the neck and the length just brushes the ground - I figured it was a good length to start with so that it would grow with him and last longer.
Then I found a mask template online- and knew that needed to be an addition to the outfit. I can't remember where I found the template, but I just google'd "superhero mask pattern" and looked through the options till I found one I liked. This was my second attempt. The first one was a horrible mess - I don't have a teflon foot for my machine and the stitching was horrible and the fabric stuck to the foot and wouldn't move. Then I remembered reading a blog that suggested using baby powder on vinyl to help the sewing process. I figured if it works on vinyl, it should work on this. And it DID! It's just really messy and I had to wait till the kiddos were asleep to do this.
Friday, December 3, 2010
Christmas Soap Dispenser
Once I saw this idea on Brown Paper Packages a while back, I knew it was going on my ever growing "to-do list"
Wednesday, December 1, 2010
Christmas Hair Clips
I made a few Christmas hair clips a few weeks back . . .
Korker Bow - a great tutorial found on Pink Tea
Candy Cane - I drew and cut out a candy cane from red felt and then used embroidery floss to add the white stripes. Then I used red thread to stitch a 2nd red felt candy cane around the edges to the back to give some stability. And then I glued it to an alligator clip I had covered in ribbon.