Friday, August 28, 2009

Rounded Burp Cloth w/ Pattern

I have a lot of burp cloths left over from my son, but I wanted some cute ones for my daughter and I can't find really cute ones . . . then I stumbled upon this pink heart fabric at Jo-Ann's and fell in love with it. So I decided to make some cute ones for my daughter - ones that I wouldn't be embarassed to use in public since my others are all stained or plain and boring.

Fabric
  • For the front, I used flannel - depending on the layout of the print pattern, you can get about a 1/4 of a yard or less to make multiple cloths. I bought 1/4 yard of the pink fabric and would be able to get 5 burp cloths out of it
  • I cut up some kitchen waffle towels to make the back - they are microfiber and really absorbant, plus they don't slip around since the towel clings a bit. I found a 2-pack of these plain white ones at Wal-Mart for about $3.50. I got 2 pieces out of the one towel with some left over if I wanted to make a smaller rectangle one.
Steps to make 2 burp cloths:
  1. Cut 4 pieces of fabric from pattern (download pattern here). I used flannel for the 2 fronts and 2 backs out of microfiber waffle towel.
  2. Place right sides together and pin the pieces to eachother
  3. Sew at 1/4" seam allowance (or at the presser foot) . . . BUT leave a couple inches on one of the sides un-sewn
  4. Turn the cloth right side out through the hole you left in the side seam
  5. Iron edges
  6. Top-stitch around the entire edge to keep in place and to close the hole in the side - I sewed it pretty close to the edge

Optional - I added a white circle with a green heart on one end with wonder under (applique). After ironing the pieces on, I stitched around the edge of the circle to add detail.

Wednesday, August 26, 2009

Fabric flower headband or hair clip

I found these fabric flowers on a few blogs and used the tutorial from here to make them. I did do a couple different things than the tutorial - I only cut 3 circles since I wanted a little flower and only a single layer. I think the circles were a tad over 3" when I cut them - not sure since I used a circle template.
I am now in love with the fabric button cover kit . . . It is so easy and cute! It was a little over $3 at Jo-Anns but I used a 40% off coupon since I didn't see anything else I liked that trip (shocking, I know).

I then glued it to an alligator hair clip so it can be used as a toddler hair clip or so I can clip it on a headband for a baby (or a toddler with no hair). I'm afraid my daughter will have no hair like my son. Ethan is 18 months old and just starting to grow more than peach fuzz on his head.

Saturday, August 22, 2009

Baby Info Blocks

I've been trying different ways and layouts to display my son's name with his birth info, and this is the design I settled on. I've seen it on one square block and that's what got my creative juices flowing - but I wanted something a little different.

My husband cut the wood into 3 pieces for me and then I painted it and burnished the edges with brown stamp pad ink - then applied the vinyl I cut with my Cricut Expression.

Thursday, August 20, 2009

Little Helper

In the previous post, I showed the family name board that I was making for a customer. When my husband got home, I had him hammer in the jagged edged wall hooks on the back - I don't like hammering those tiny nails, so I'll let him smash his fingers while I cross mine that he doesn't put dents in the back of the board. :)

When my son saw what Daddy was doing, he instantly grabbed his plastic hammer from his toy bucket and joined in. I thought it was adorable!

Wednesday, August 19, 2009

Vinyl Name Boards

I first made these vinyl name boards about 3 years ago. I've seen other styles since then, but I still like the "established xxxx" text over the top of the last name as opposed to it's own line. And since then, I've made them for all my siblings, my parents and in-laws. And then someone my mom knows saw the board I made her in the spring and asked me to make one for her too. My first vinyl (non-family) project!!

Here's the one I made for my first "customer." This one is about 7"x23"
And here's the one I made for myself at a craft group 3 years ago - I actually want to re-do mine with a more modern font to match my decor instead of the block style for the last name, but it seems point-less since I already have one.

Wednesday, August 12, 2009

Milk Carton Baby Shower Favors

I found this idea on Creative Itch for Father's Day and made 3 of the milk cartons and the cards. When it came time to find a party favor for an upcoming baby shower for a boy and a girl baby, I wanted to make these milk cartons again.

So I ended up making 30 of them to fill with candy . . .
The original pattern calls for a piece of paper that is 7"x11", but if I was making it out of a 12"x12" paper, I could only get one milk carton per piece of paper - with a lot of paper left over. So I tweaked the measurments and made it 6"x11" so I could get 2 cartons per piece of paper with very little left over.
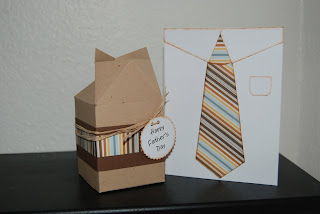
But that meant I had to change the folding measurements as well. If you follow the tutorial linked on Creative Itch (here), but want to make the same size I did, just cut it 6"x11" and when you score the short side of the paper, make the lines at 1.5", 4", and 5.5". You can't really notice the difference when they're done, but when you're making multiple cartons, it helps to save paper.

In making 30 of these, it probably took me a total of 8 hours from start to end - but that was spread over a week of trying to do it during nap time. And my wonderful sister-in-law, Kari, helped me with some of the process. Thanks, Kari!!!!!

Here's a pic of the Father's Day carton and card I made for my husband, father, and father-in-law and filled up with their favorite candy. The card idea came from Creative Itch as well.


Monday, August 10, 2009

Market Skirt

I fell in love with these skirts from Dana at MADE.
She made them and did a giveaway a few months back, and I was crossing my fingers that she would create a tutorial for these skirts - and she DID! I was using my scrap fabric, and I didn't have enough to make the standard size in the tutorial. So I made one that should fit a 1 year old by multiplying it all by a certain percentage (i don't remember what number I used anymore - but i figured it all out by measuring my son's waist since he's in that age range) But then a week or so later, Dana put up instruction help for making it smaller or larger - posted on her site as well. Since the skirt was smaller, I shrunk the pocket too.

This skirt was fun to make - I got to use my grandma's serger on it that I recently acquired!

Button holes still scare me, so I just sewed the pocket shut with the button - I figured my daughter won't be putting things in her pocket when she turns 1, so I got to skip button holes :)

Friday, August 7, 2009

Load o' B-day cards

Since I have a baby on the way, I know I'm running out of time to get things done, so I decided to make a bunch of b-day cards to have them ready when family birthdays come up. That way, I won't have to try and make one at the same time as when I've got a toddler and a newborn pulling me in every direction.


I saw this idea at Creative Itch and decided it was a great one that's universal to any age and gender. . . so I made 8 of them. And you can't tell from the pictures, but the "happy birthday" circle piece is popped out with dimensional stickies! And I used brown or black ink to distress the edges of the squares. It makes for a more polished and cleaner look than just the squares by themselves.

Tuesday, August 4, 2009

Bubble skirt and applique tank top

I made this outfit for my 5 year old niece for her birthday. I applique'd the hearts on the tank top to match the fabric for the skirt.
The skirt was a headache for me. I loved the idea of a bubble skirt and tried to alter and do it myself. The waistband gave me the most trouble. I think it was partly because the fabric I used was thick, heavy, and stretchy, so it wasn't easy to sew. Next time, I'll take pictures of the process and make a tutorial out of it, but I'll use a t-shirt knit fabric or cotton next time.
I didn't get a picture of her wearing it to post since it got tossed to the side in favor of the new toys she wanted to play with instead. But I love that it bubbles out at the bottom since the inner lining layer is shorter and thinner so it pulls in the top layer to bubble out.

Sunday, August 2, 2009

Applique Bird & Ruffle Butt Onesie

I created a pattern for a bird to applique on a onesie and wanted to add something else to it, so I followed the tutorial on Crap I've Made to put ruffles on the butt of the onesie. Her tutorial shows how to do it with or without a serger - and it's super easy to follow.
If you want the pattern for the bird, you can download the PDF that I created here.

I'd never used a serger before and was a bit scared to as well. But I ventured over to my Mother-in-Law's house to try this on her's. It was fun - and easier than I had thought. My mom had a serger that my Grandma had given her, so after I made these ruffles, I "borrowed" my mom's serger. She doesn't know she's not getting it back for a long time :) Luckily for him, my son is too big to fit into this onesie to model it.
Applique instructions:

Supplies
  • wonder under
  • fabric
  • iron
  • sewing machine
  1. Iron the wonder under to the under side of the fabric you'll be cutting out.
  2. Trace your pattern onto the paper side of the fabric/wonder under piece and cut out
  3. Peel off the paper backing from the wonder under
  4. Iron the shape onto your desired shirt/item
  5. Top stitch around the edges of your pieces to add a little protection when it's washed